

Push Notifications Setup
Ride alerts reach customers, drivers and your admin team automatically. Add the iPhone push key, give the admin panel its push keys, and see where the message texts live.
Every notification travels through Firebase Cloud Messaging (FCM). Some are sent by your Cloud Functions (for example "New Ride Request" to the nearest driver, or a new support ticket to an employee); the others are sent by the apps themselves, using the Firebase service account file you upload in the admin panel. You add a few keys once; nothing has to be pasted into the phone apps' code.
| Who | Where | Receives, for example |
|---|---|---|
| Customer | Customer app | Ride accepted, started and completed, new offers from drivers, ride cancelled, chat messages, your own messages |
| Driver | Driver app | New ride requests (with a special ringing sound), ride cancelled, payment received, payment method changed, new reviews, chat messages, your own messages |
| Admin and employees | Admin panel (the bell and browser pop-ups) | Drivers submitting documents, new support tickets and messages, withdrawal requests, SOS alerts |


The dispatcher panel has no push
Dispatchers see new bookings live on their screen, so the dispatcher panel does not ask for notifications.
1. Android#
Nothing to do. Notifications work as soon as the apps are connected to your Firebase project (Connect with FlutterFire). On Android 13 and newer, the app asks the user to allow notifications the first time it opens.
The new-ride sound
New ride requests ring with booking_notification.wav. To use your own sound, replace driver/android/app/src/main/res/raw/booking_notification.wav (and the same file in customer/android/…/res/raw/) with your file, keep the name, and build the app again. Already-installed apps may keep the old sound until they are uninstalled and installed again, because Android remembers a notification channel's sound.
2. iPhone: the APNs key#
Apple delivers iPhone notifications. Firebase needs your Apple push key (an APNs authentication key) to talk to Apple. You need an Apple Developer account; see iPhone release.
Create the key#
Go to Apple Developer › Certificates, IDs & Profiles › Keys and click +. Give it a name, tick Apple Push Notifications service (APNs), click Continue and Register. Download the .p8 file: Apple lets you download it only once, so keep it safe. Note the Key ID shown on the page and your Team ID (top right of the developer site, or under Membership).
Upload it to Firebase#
Open Firebase consoleProject settingsCloud Messaging. Under Apple app configuration, select your iOS customer app, click Upload next to the APNs authentication key, choose the .p8 file and type the Key ID and Team ID. Repeat for the iOS driver app. One key works for both apps.

- 1The Cloud Messaging tab.
- 2Sender ID: you need it in step 3.
- 3Pick each iOS app (customer and driver).
- 4Key ID and Team ID go with the key.
- 5Upload the .p8 key (production; you can add the same key for development too).
Check the app's push settings#
The iOS projects already include push notifications and the remote notifications background mode. If you created your own bundle ID, open ios/Runner.xcworkspace in Xcode and make sure Push Notifications is listed under Signing & Capabilities for your team.
Test on a real iPhone
The iOS Simulator cannot receive push notifications. Test on a real device, signed in, with notifications allowed.
3. The admin panel's push keys#
The apps and the admin panel read four values from SettingsGeneral Settings. Collect them from Firebase first.
Copy the Sender ID#
On the same Cloud Messaging tab, the box Firebase Cloud Messaging API (V1) must say Enabled. Copy the Sender ID (a long number, also called the project number).
Copy the web push key#
Scroll down to Web configuration › Web Push certificates. If there is no key yet, click Generate key pair. Copy the long text in the Key pair column with the copy button. This key (also called the VAPID key) lets the admin panel receive browser notifications.
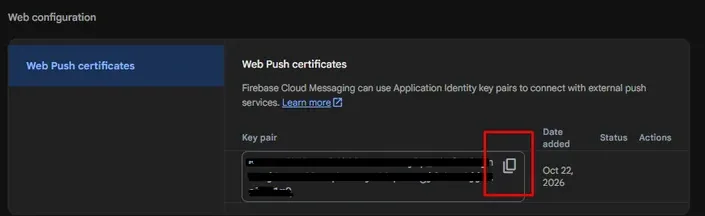
- 1Web Push certificates.
- 2The key pair. Click Generate key pair if this is empty.
- 3Copy the key.
Have the service account file ready#
The apps sign every notification they send with your Firebase service account key: the JSON file you downloaded in Service account key. If you no longer have it, create a new one in Firebase consoleProject settingsService accountsGenerate new private key.
Paste everything in the admin panel#
Open SettingsGeneral Settings, fill in the fields and click Save. All three text fields are required.

- 1Notification Sender Key: the Sender ID.
- 2Web Notification Key: the web push key pair.
- 3Client Id For Google Login (see Authentication).
- 4Upload JSON File: the service account key.
- 5Save.
| Field | What to enter |
|---|---|
| Notification Sender Key | The Sender ID from the Cloud Messaging tab. |
| Web Notification Key | The web push Key pair. |
| Client Id For Google Login | The Web client ID of the Google sign-in provider: Authentication. |
| Upload JSON File | The service account .json file. It is stored in your Firebase Storage and read by the apps when they send a notification. The × removes the current file so you can pick a new one. |
Without the JSON file, the apps send nothing
If the service account file is missing or belongs to another project, notifications that the apps send (ride accepted, ride started, chat…) silently fail. The ones sent by Cloud Functions still arrive. If only some notifications work, check this file first.
4. Browser notifications for the admin panel#
The admin panel can show pop-up notifications even when its tab is in the background. Three things must be right:
- The service worker file.
admin/web/firebase-messaging-sw.jsholds a copy of your Firebase web settings infirebase.initializeApp({ … }). Replace them with your own (same values as thewebpart ofadmin/lib/firebase_options.dart), then build and deploy the panel again. See Prepare & build. - HTTPS. Browsers allow notifications only on
https://pages (andlocalhostwhile testing). See Domains & SSL. - Permission. After signing in, the browser asks to allow notifications. Click Allow. If you clicked Block, click the padlock next to the address and set Notifications to Allow.

- 1The bell shows unread alerts.
- 2Click an alert, for example a driver who submitted documents.
- 3Mark As All Read.
5. The message texts#
MyTaxi has three kinds of messages, each edited in a different place:
| Kind | Examples | Where the text lives |
|---|---|---|
| Ride and system notifications | "New Ride Request", "Your Ride is Accepted", "Your Ride is Cancelled", "New Support Ticket Assigned" | Written in the code of the apps (customer/lib, driver/lib) and of the Cloud Functions (functions/index.js). They work out of the box; change them only if you are comfortable editing code. |
| Emails | Booking completed, welcome email, refer & earn, wallet top-up, withdrawal requested and approved | Email Templates in the admin panel. Each template has an on/off switch, a preview and an editor with placeholders such as {{name}} or {{booking_id}}. Emails need SMTP: Email & SMTP. |
| Your own messages | Offers, news, service updates | Push Notification+ New Notification in the admin panel. See Notifications & email templates. |
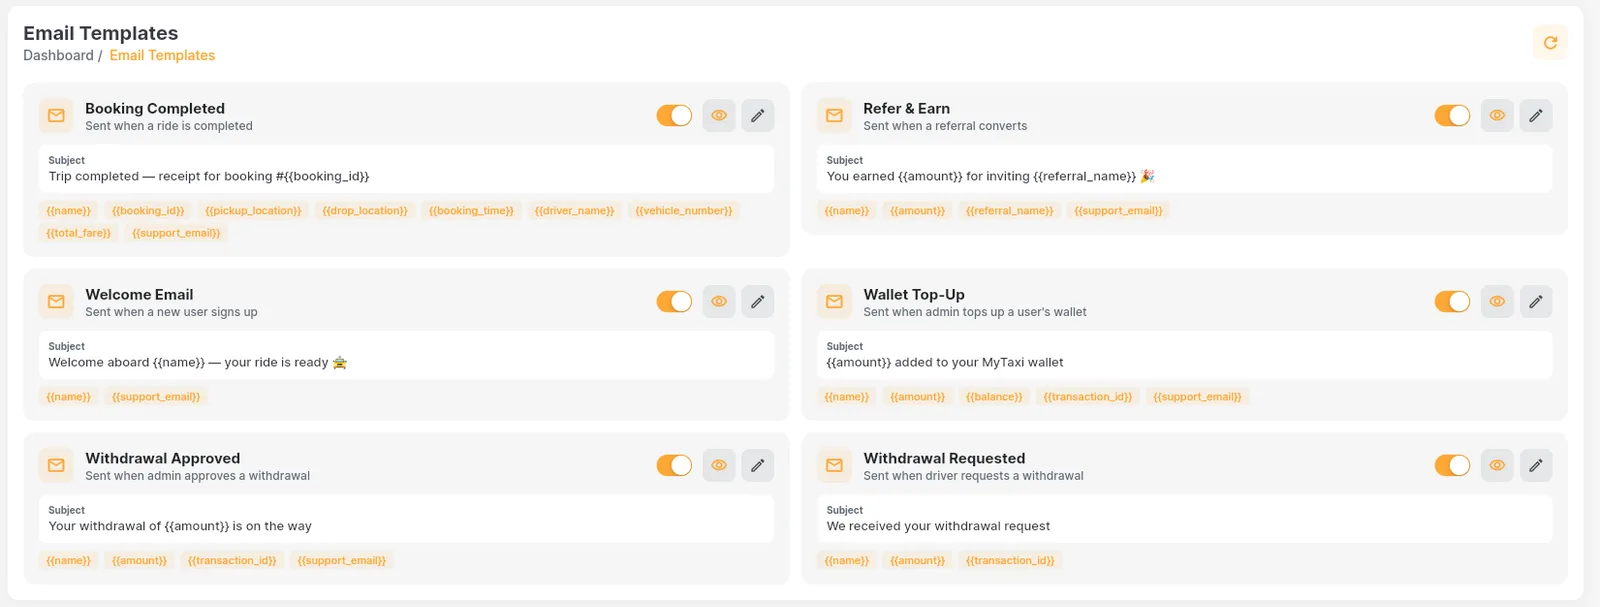
- 1Send this email or not.
- 2Preview.
- 3Edit the subject and the text.
- 4Placeholders the server fills in.
Test it#
- Sign in to the customer app and the driver app on real phones and allow notifications.
- Put the driver online and book a ride with the customer: the driver's phone rings with "New Ride Request".
- Accept the ride: the customer gets "Your Ride is Accepted". Start and complete it: the customer gets each update.
- On an iPhone, repeat the test to check the APNs key.
- In the admin panel (on https), allow notifications, then submit driver documents or open a support ticket from an app: the bell shows the alert.
- Send yourself a message from Push Notification in the admin panel.
Common questions#
No notification arrives at all.
Check that SettingsGeneral Settings has the Sender ID and a service account JSON file from this Firebase project, and that Firebase Cloud Messaging API (V1) shows Enabled on the Cloud Messaging tab. Then sign out and in again in the app, so it saves a fresh device token.
Android works, iPhone does not.
The APNs key is missing for that iOS app, the Key ID or Team ID is wrong, or you are testing on the Simulator. Upload the key for both the customer and the driver iOS app.
The admin panel never asks for permission.
The panel is opened on http://, the Web Notification Key is empty or wrong, or notifications were blocked for the site earlier. Fix the key, open the panel on https:// and allow notifications in the site settings.