

Run the setup tool
One press deploys the rules, the indexes, the Storage rules, the starter data and the Cloud Functions — then you check the backend really works.
This is the step that turns an empty Firebase project into eLernova's backend. The tool runs entirely on your own machine, talks only to your project, and never touches your firebase login account.
Do this before anything else in the apps
Until this deploy finishes, every read and write is denied and the apps will look broken. It is the gate the rest of the setup waits on.
Before you press start
- Node.js 20 or newer is installed (
node --version). Requirements - Your
key.jsonis ready. Service account key - Your project is on the Blaze plan and Storage has been started.
- The Firestore database exists, in production mode.
Start the tool
Open the firebase_setup/ folder and double-click start.bat on Windows, or run ./start.sh on macOS and Linux. From a terminal, npm start does the same.
On the very first run it installs its own packages, which takes one to three minutes. Then it opens a local page in your browser.
It only listens on your own machine
The server binds to 127.0.0.1, so nothing outside your computer can reach it. Your uploaded key is written to a temporary folder for the length of the deploy and deleted afterwards.
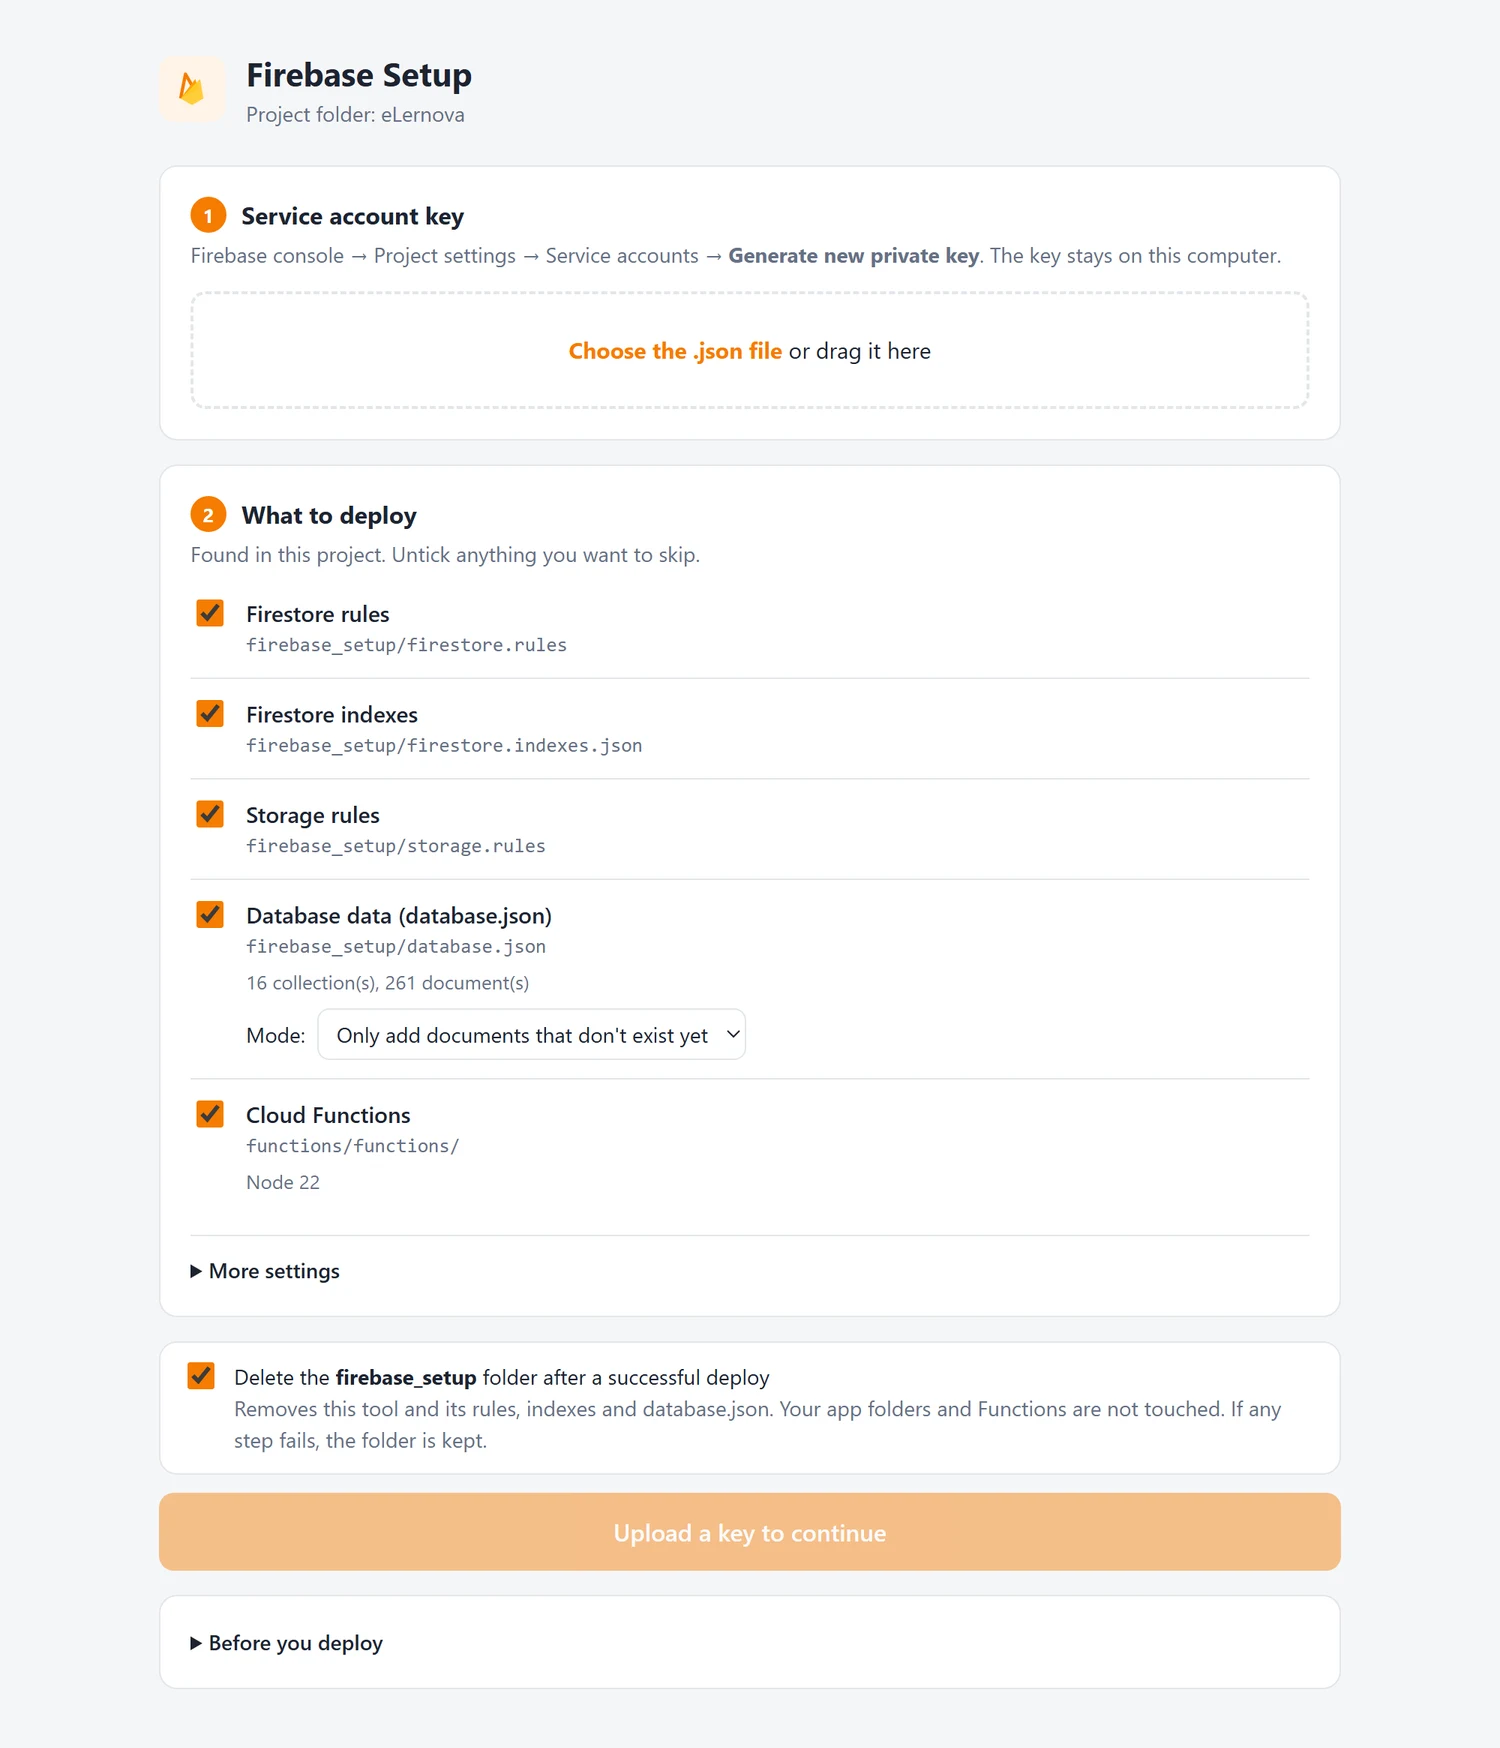
- 1Choose the key you downloaded, or drag it onto the page.
- 2Everything eLernova needs is found and ticked. Untick anything you want to skip.
- 3The starter data, and how many documents it holds.
- 4Mode decides what happens to documents that already exist.
- 5The Cloud Functions folder and the runtime it will deploy on.
- 6Removes the tool after a successful deploy. If any step fails, the folder is kept.
- 7Becomes Deploy to your project once a key is chosen.
Give it your key
If key.json is already in the folder the page picks it up. Otherwise drag the file onto the upload box. The page then shows which project it is about to deploy to — check the project ID is the right one before going on.
Choose what to deploy
For a first run, leave everything ticked:
| Part | What it does |
|---|---|
| Firestore rules | Who may read and write each collection |
| Firestore indexes | The composite indexes the app queries need |
| Storage rules | Who may upload and download files |
| Seed data | Settings, categories, email and certificate templates |
| Cloud Functions | The payment, email and push backend |
Press Deploy
The log fills in as it works. Cloud Functions are the slow part — three to eight minutes is normal on a first deploy, because Google builds a container for them. Leave the page open.
Read the result
Each part reports done or an error with the fix spelled out. If a part fails because a Google API is not enabled yet, the log prints the link — open it, press Enable, wait a minute and deploy again. Re-running is always safe.
Confirm the functions are live
When the deploy finishes, open the Firebase console → Build → Functions. You should see this list:
| Function | What it does |
|---|---|
getPaymentConfig | Hands the app the public gateway keys only |
createPurchaseOrder | Prices the sale: course, coupon, commission, tax — and writes the order |
verifyAndCompletePurchase | Asks the gateway whether the money arrived, then enrolls and credits |
sendPush | Delivers a push notification |
deliverScheduledPushNotifications | Sends scheduled notifications on a timer |
sendEventNotificationPush | Push for the automatic events |
sendTemplatedEmail | Sends an email from one of your templates |
emailStudentWelcome / emailInstructorWelcome | Welcome emails on sign-up |
emailWithdrawalRequested / emailWithdrawalCompleted | Payout emails |
deleteMyAccount | The in-app account deletion students can request |
Test the whole money path
A deploy that lists the functions is not proof that selling works. Do this once, in sandbox:
Set up a cheap test course
Create an instructor, build a one-lecture course, price it at the smallest amount your gateway allows, and approve it.
Buy it as a student
Sign up as a student, add it to the cart and pay with the gateway's test card.
Check all five
- The payment succeeded at the gateway.
- The student is enrolled and can open the first lecture.
- An order exists under FINANCE & MARKETING → Revenue with the right price, commission and tax.
- Your commission appears in admin revenue.
- The instructor's wallet balance rose by their share.
If the payment goes through but nothing else happens, the gateway succeeded and verification failed — read the function logs next.
Reading the payment logs
The payment functions log every step with a trace ID, and deliberately never print a secret — a key is described ("present, 32 characters") rather than shown.
firebase functions:log --only verifyAndCompletePurchaseOr open Build → Functions → Logs in the console.
| Log message | What it means |
|---|---|
signature_mismatch | The gateway secret key here does not match the one that signed the payment — usually test keys against a live payment, or a copy-paste error |
payment_lookup_failed | The gateway did not recognise the payment ID. Often a sandbox/live mix-up |
purchase already completed | A duplicate call. Harmless — the function refuses to enroll twice |
… secretKey MISSING | That gateway has no secret key saved in the admin panel |
unauthenticated | The app called without being signed in |
Common stops, and what they mean
| The log says | What to do |
|---|---|
| Needs the Blaze plan | Upgrade the project. Blaze plan & Storage |
| This key isn't allowed to deploy… | Give the service account the Owner role in Google Cloud IAM, wait 5–10 minutes, deploy again |
| A Google API is not enabled | Open the link in the log, press Enable, wait a minute, deploy again |
| Storage bucket not found | Press Get started under Build → Storage first. Blaze plan & Storage |
Troubleshooting has the longer list.
All parts green?
Go to Verify & Storage CORS and confirm it landed.
Re-running it later
The tool is safe to run again any time. Two things worth knowing:
- Rules, indexes and functions are replaced wholesale each time — that is the point.
- Seed data re-imports the starter documents. If you have already set up branding and settings, untick Seed data so your work is not overwritten.